


A tour of the Holy Land is a little different than most trips you will go on in your life. A typical tour stays in a different city every night. So, you will live out of your suitcase. And, you’ll get accustomed to traveling on a bus. So, you’ll have to carry what you need for the day in a smaller bag. And you’ll want to get more pictures than you normally take.
With all this, what should you bring on a tour of the Holy Land? Here are 10 must-have amenities for your Holy Land Tour:
- A Daypack That is Easy to Deal With and Secure
- A Suitcase That is Easy to Pack and Lug Around
- Packing cubes
- A Power Adapter that can Handle All Your Devices
- A Camera
- A Computer of Some Kind
- A Portable Power Bank
- A Travel Pillow
- A Clothesline, drain stopper, and laundry detergent.
- A Water Bottle
As you can see, this isn’t a list to get you to buy something you don’t need. My goal here is to help you pack appropriately. And you might already have some of the items on this list.
A daypack that is easy to deal with and secure
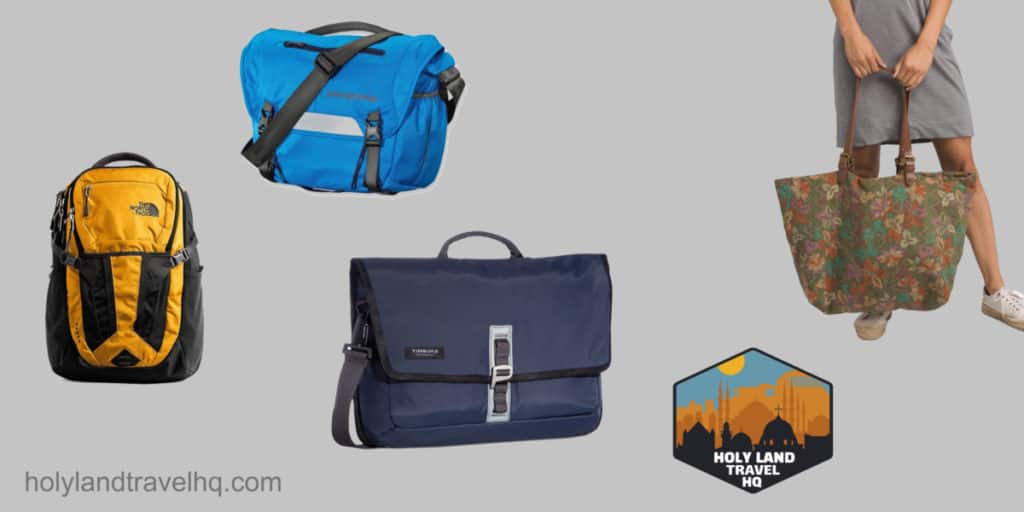
Most people bring backpacks, though there are a few who bring shoulder bags, handbags, or purses. The first thing we want to think about here is security.
How easily can someone snatch your bag or something from it? My general rule is that a bag should have two (2) secure connections to your body. If you have a backpack, place your arms through both straps.
If you have a shoulder bag, handbag, or purse, sling the strap over your head and across your body. Then place one hand somewhere on the bag at all times. The strap and cleats need to be of sturdy construction. A Gucci bag will not do here.
All bags should have zippered compartments. Backpacks usually do, but shoulder bags, handbags and purses are hit or miss. You want to have zippers for all outer pockets and the main compartment. Flaps that cover the main compartment and latches at the bottom of the bag with two (2) clips are fantastic for security.
For a discussion on pockets and zippers, check out my post on the topic right here.
Some features you want to look for in a good daypack is 1) an outer pouch to hold a water bottle. 2) A small, zippered compartment for storing items such as power cords, extra camera batteries, and pens. And 3) a main compartment big enough for an 8.5” x 11” tablet and lesson book.
Many Holy Land tours use lesson books, which the guide will have you read and take notes with. You should be able to pull these out easily then put them back so you can get to taking pictures. Shoulder bags are really good for this. But backpacks offer better freedom of movement.
What daypack I use.
Most of the time, I use a Northface Backpack. Northface uses YKK zippers which are sturdy and rarely develop broken teeth or jams. I’ve had zippers break before and render a backpack useless. I don’t want this happening while traveling.
When I zip up the main compartment, I only move one of the sliders. I never zip the two sliders to the middle. They can easily come undone and leave you with an unintended open compartment. I always zip a slider completely across the length of the zipper.
I used a shoulder bag on a trip to the Holy Land once. It wasn’t the greatest setup, mainly because I wasn’t used to it. I got tired of constantly taking my backpack on and off to get to my lesson guide. So, I bought the shoulder bag to use on a site.
My shoulder bag had a water bottle pouch on the outside and a small zippered compartment on the outside of the flap. The flap covered the main compartment opening and latched with two clips on the bottom of the bag. It was secure and easy to get into when I needed it.
Overall, I like the backpack more, though.
A Suitcase That is Easy to Pack and Lug Around
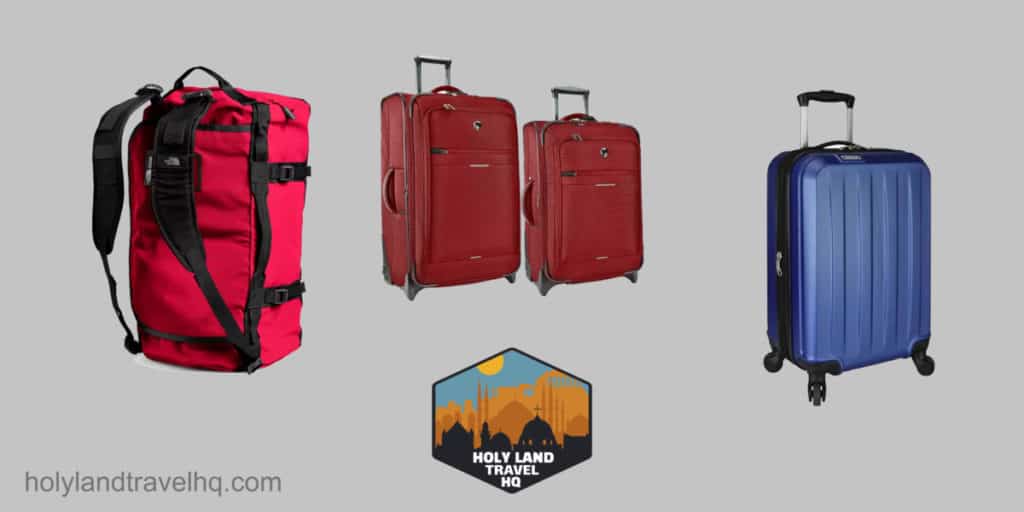
You need to have a suitcase you are willing to deal with daily. Holy Land tours are nomadic by nature. Educational tours tend to spend more time in certain areas, which may result in longer stays at a hotel.
Either way, you need to make sure your suitcase is:
- Easy to access
- Secure
- Of solid construction
The most common suitcase I’ve seen on a Holy Land Tour is a rolling suitcase. You can roll them into an elevator and to your room easily. For older travelers, this is the most desirable option.
Rolling suitcases tend to fold open for ease of access and have internal compartmentalization. This makes packing and unpacking easy.
Duffle style suitcases can be more difficult in terms of ease of access. They tend not to have internal compartmental organization, which means you have to pack thoughtfully.
Both styles of suitcases are hit or miss when it comes to security. What you want to look for here are zipper sliders that will accommodate TSA locks. This also means that zippers need to be sturdy.
When I say solid construction, I ‘m talking about wheels, zippers, and handles.
There are two types of wheels. Spinners and skates.
Spinner wheels come in fours and rotate freely. They allow a bag to stand on its end so you can move the bag with little effort.
Skate wheels come in twos and are fixed. To roll the bag, you tilt it at an angle. Skate wheels are more durable than spinner wheels.
Durable zippers usually have larger teeth. Metal teeth are also a sign of durability. If the sliders have the letters YKK on them, odds are they are highly durable. YKK is considered the top brand in the zipper industry (direct link to YKK).
What suitcase I use.
I like to move quickly, so I use a Northface duffle bag. Duffle bags tend to be smaller than rolling bags. So, they don’t get as heavy as rolling bags do.
My duffle bag has a single compartment, which means I have to thoughtfully pack if I think I may need something. It also comes with shoulder straps which I can use to sling the duffle or carry it like a backpack. When I carry the duffle like a backpack, I put my actual backpack on my chest. I do this if I need to move quickly.
I’ve used rolling suitcases and bags before, and they are great for heavy loads. These bags have always had skate style wheels, though. I’ve never used a suitcase with spinner style wheels.
Wheel size has been an issue as well.
Smaller wheels can get caught on lips in a sidewalk, or get thrashed by cobblestone pathways and roads. This is especially true for spinner wheels, which break more often. Spinner wheels are designed for vertical strength but often lack adequate horizontal torsion strength.
Also, the larger the wheel, the better, but don’t get too crazy. Extremely large wheels can take away from space on the inside of the suitcase. I’d say stay within 2” to 3” in diameter.
For a great article on suitcase choice, check out this blog post by Expert World Traveler right here.
Packing Cubes.
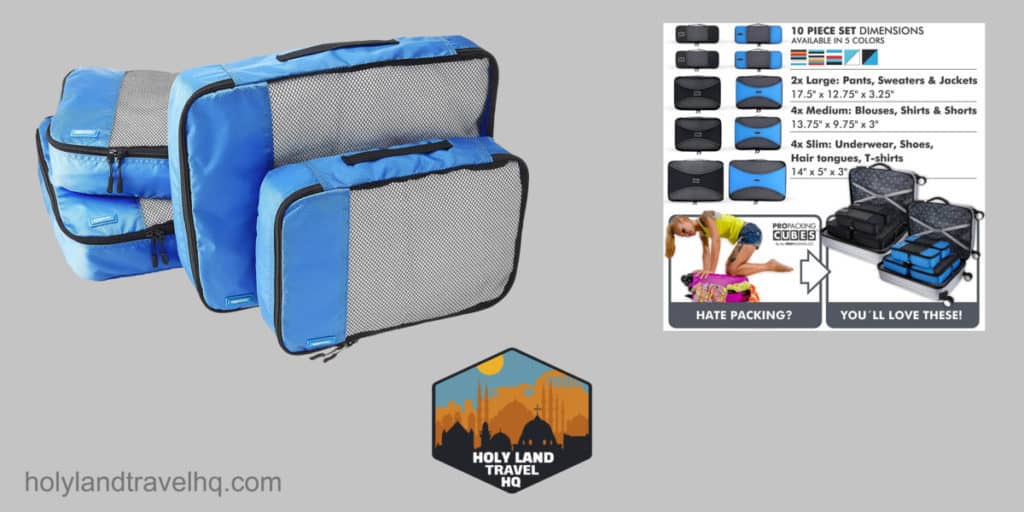
Whether you use a rolling suitcase or a duffle bag suitcase, packing cubes are great for a Holy Land tour. Like I said above, these tours are nomadic. You are moving to a different hotel every night.
Packing cubes allow you to group like-items in a cube. You can unpack or rummage through your suitcase and then repack quickly.
Essentially, packing cubes are a way to stay packed, even when you’re unpacked.
Sets often come in a variety of sizes to accommodate different items. They range in price between $20 and about $40. The difference comes down to quantity, not quality. Amazon has plenty of options to choose from (direct link). They are all good options.
One way to maximize your use of packing cubes is to develop a habit of only taking what you need out. When you are done with that item, put it back in its cube rather than just setting it down. This prevents you from forgetting something in the haste of the nomadic style of travel.
Also, set aside a large cube for laundry. Make a habit of placing dirty laundry in the cube as the last step before closing up your bag. This will allow your dirty laundry to air out overnight and not stink up your bag.
Lastly, use a medium or small cube to hold all of your power cords, computer accessories, and anything else you may need during the day. Place this in either your day bag or the upper shelf of the bus.
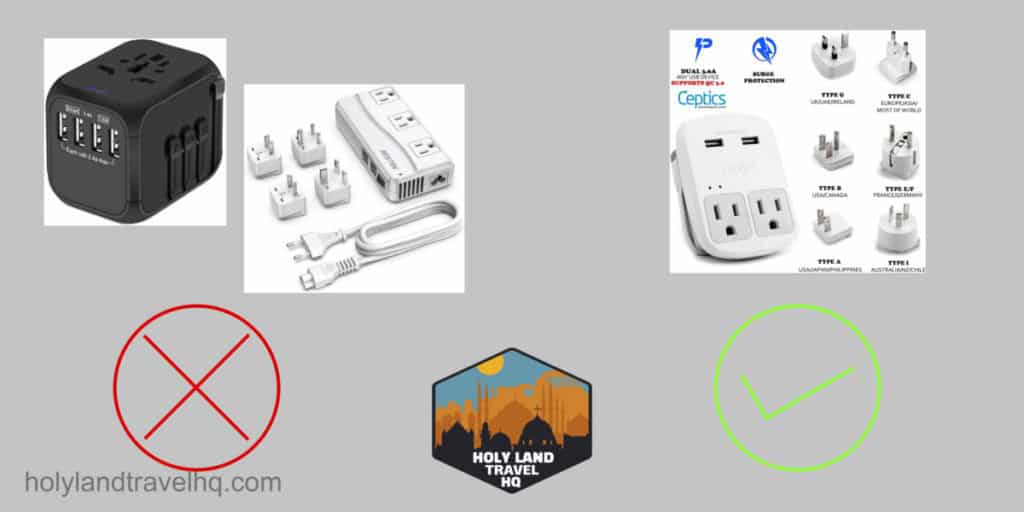
A Power Adapter that can Handle All Your Devices.
Power is going to be an issue wherever you travel. This is true in the United States and overseas. You will need to keep all of your electronic items charged throughout the day. So, you need to make good use of what few outlets a hotel might give you.
Power adapters come in all sizes and quality.
There are two styles of adapters. To make sure we are using the same language, here are some terms I am going to use. When I say “input,” I’m referring to the prongs that get inserted into a wall outlet. When I say “output,” I’m referring to the holes you would plug your electronic accessory into.
The first style is the universal adapter. These devices are typically all-in-one tools. They have levers and switches that change the input prongs for the region you need. The output holes are often a combination of all the outlet options from around the world. Whatever plug you have, it’ll fit.
Universal adapters have too many parts, which means there are ample opportunities for it to fail or break. The output holes tend to be loose, and your plug can sometimes fail to connect with contact surfaces. This means you can’t always trust if your device has been charged or not.
I’ll call the second style the basic adapter. Basic adapters typically have a set of attachable prongs for each region of the world. Outlet holes are for a single region only, such as the United States or Europe.
Basic adapters have no moving parts. Prongs are attached as needed. They aren’t perfect, but in my experience, they are more reliable than universal adapters.
To see what I use, check out my gadget recommendations right here.
Power Adapters versus Power Converters.
Something to note here, power adapters don’t convert power. So, 220 volts will not get changed to 110 volts. Whatever power goes into the adapter, the same goes out to your device.
Almost all electronics these days can take 110 volts or 220 volts. It doesn’t matter. But check your device anyway. There should be a sticker on the device, or the battery charger, or the power cord with the electrical rating.
Power or voltage converters change the characteristics of power. FYI, power is measured in watts.
When a converter changes the power, it does so by changing voltage and current. Our power = voltage x current stays in equilibrium, but the characteristics change.
I do not recommend travel style power converters.
Cheap travel converters produce low power, typically 100 watts. Devices such as your phone, camera, iPod, or iPad alone will never get close to 100 watts. However, attaching multiple devices can sometimes exceed this limit.
Converters get bigger and heavier as wattage ratings go up. I used to have a 1,000-watt converter I lugged around on deployments. It was a pain in the neck, but worth the effort for those trips.
When the wattage needed by an attached device exceeds the wattage rating of the converter, the converter will fail. Most of the time, this results in crackling or a little smoke and a toasted converter.
A hairdryer with a rating of 750 watts or 1,500 watts will cause a 100-watt travel converter to burst into flames.
The power adapter I use (link here) when I travel on short trips is a basic style adapter. It can handle up to 1,250 watts because it doesn’t convert anything. It’s just a bridge to get my devices to the power at the wall.
A Camera
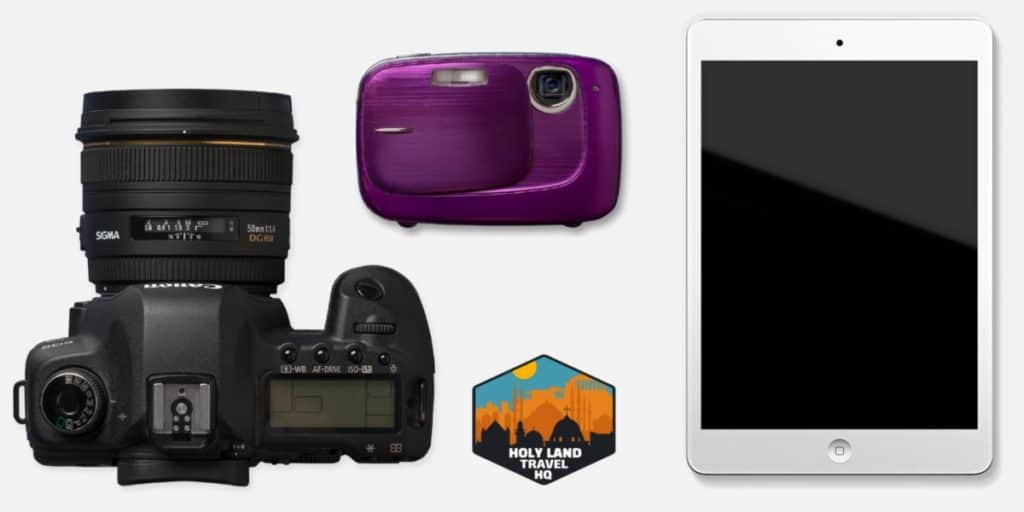
You are going to the Holy Land to see a bunch of ancient stuff. You NEED a camera. But you know this already.
What kind of camera do you need for a Holy Land tour? The camera you are familiar with is the one you want for your trip.
If this is a once in a lifetime opportunity, don’t go overboard. Some people are avid photographers and have fancy Digital Single-Lens Reflex, or DSLR cameras that cost $2,000. And they have detachable lenses for different situations.
If you’ve never used one of these, don’t get one.
On my trips to the holy land, I’ve seen people use their iPhone or iPad cameras. I’ve even seen point-and-shoot digital cameras. These are single unit cameras with built-in lenses, and they are typically cheap to buy. Unfortunately, they can be just as complicated as a DSLR sometimes.
Most smartphone cameras are more than capable of handling a Holy Land Tour.
When I travel, I use a DSLR camera with a 24-70 zoom lens. I also use my iPhone. On my last trip, I took about 6,000 photos — about 2,000 of those I took with my iPhone.
I use photoshop on my laptop, but on my iPhone, I have several free photo editing applications. These applications have preset photo filters. I like some of the presets so much that I sometimes transfer photos from my DSLR to my phone to edit.
The bottom line is, use what you are familiar with. Whatever you go with, make sure you are prepared with backup power. Buy extra batteries if need be. Or if it’s your phone, buy a portable power bank.
A Portable Power Bank.

Most people have smartphones these days. So, this is a no brainer.
A portable power bank is nothing more than a rechargeable battery. They have a USB charging port or two to connect your devices.
When you travel, the thing you will not have is your car. You will quickly notice how much you rely on your car to power your devices throughout the day.
Without your car, you will feel naked when it comes to power.
Portable power banks are typically the size of a smartphone, but a little thicker. You can slide it into your pocket or a water bottle pouch on your bag.
Depending on the rating, you can charge your smartphone multiple times before recharging the power bank. Anything with a rating over 10,000 mAh should keep you going all day, if not for a few days.
Amazon has a wide array of portable power banks available (direct link to Amazon search). They cost anywhere from $15 and up.
I recommend staying in the $25 to $50 range. Anything you find there will do the job for your trip.
Keep in mind though; these power banks only charge smartphones, iPods, IPads, and tablets that use USB power cords. Laptops with regular outlet prongs need to draw power from an outlet.
Some travel tour buses come with outlets at each seat. But don’t count on it.
A Computer.
The reason for this recommendation is threefold. The first is communication. The ability to communicate around the world these days is amazing. You’re going to want to stay connected to family and friends while you’re on your trip.
The second reason is for notetaking. Even if you don’t take notes, you’re going to want to take notes on your trip. You will receive a lot of information daily.
If you are old school and like to take paper notes, that’s fine too. Use this recommendation to think about what you need to facilitate that. Extra pens or pencils? A special notebook? Remember, though, stick to what you are used to.
Ok, back to computers. The third reason for bringing a computer is to store and backup your photos.
You don’t need anything elaborate. I use a Microsoft Surface, which is a cross between a tablet and a laptop. It’s got an attached kickstand and an attachable keyboard that acts as a screen cover. It also has a hard drive, a USB port, and a mini-SD card port for external storage.
Apple recently released a screen cover that also acts as a kickstand and keyboard for your iPad. The problem with iPads and most traditional tablets is the lack of storage or ability to connect to external storage. For iPads, a lot of it comes down to using Bluetooth.
At the end of the day, what I recommend is something with a camera, a WiFi connection, notetaking software, and the ability to download and store images from your camera.
A Travel Pillow.
There are a few styles of travel pillows. They all come in the standard U-shape design. Some are filled with beads, some with memory foam, and others are inflatable.
None of them are better than the others. I know people who swear by the bead-filled design because they’re softer. And I know people who swear by the inflatable design because they’re compact when deflated.
You want a pillow because, at some point, you will take a nap on the bus. Don’t get a kink in your neck because you used your jacket. Just get a travel pillow.
Travel pillows range in price from about $15 to $40 on Amazon.
A clothesline, drain stopper, and laundry detergent.
In the United States, hotels have laundry rooms. If they don’t, a laundromat is usually around the corner. This is usually not the case overseas.
When you go on a Holy Land tour, you will most likely wash your clothes in your room.
Travel clotheslines come with clothespins attached and are around 12 feet in length. They also have hooks or small carabiners at the ends.
A decent travel clothesline costs about $10 on Amazon (direct link).
Most sinks or bathtubs have a drain stopper built-in, but you can never count on it. So, you need a drain stopper. You can get one at Home Depot or on Amazon for less than $10. (Links are direct).
For detergent, you have a few options. Many stores, like Walmart, Target, or CVS, sell travel items. You can get travel detergent packs that have around 6 ounces of liquid soap in them. Or you can grab a few detergent pods from home and throw them in a sandwich bag.
There is a difference between packets and pods. The 6-ounce packets are designed for doing laundry in a sink or under the faucet in the bathtub.
Detergent pods are designed for a washing machine size loads. The pods also need water to flow a bit for the packet to dissolve. Pods can be difficult to use.
Most trips are between 8 and 15 days. You don’t want to wash your clothes in large batches, though. You should do a little at a time. Maybe not every night. Every other night might be a good plan or every three nights.
Whatever number you come up with, add 25%. So, if you go on a 14-day trip and you plan on washing clothes every three nights, that’s 5 washings. So, bring 6 or 7 packets.
A water bottle.
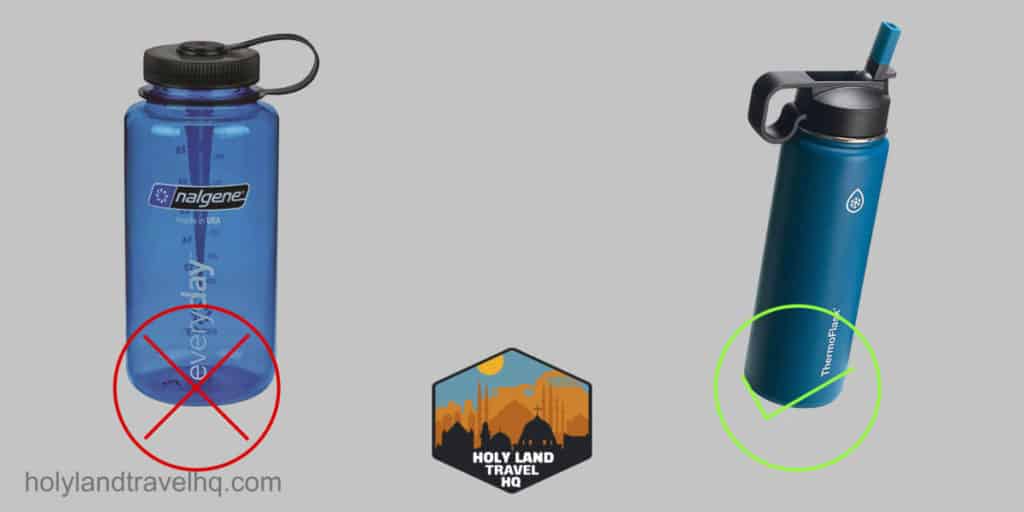
A water bottle is a no-brainer, but here are some things to think about when choosing the right one. You want your water to stay cold. You also want to sip throughout the day rather than chug when you suddenly feel thirsty.
Stainless steel vacuum-sealed water bottles keep their contents cool. I recommend these over the standard plastic Nalgene bottles. The issue you’ll have is that the outside metal can get hot to the touch under the sun. So, you will want to get a cover or skin for it.
Another feature to consider is a handle or loop, which makes the bottle easier to carry when wandering a site. Straps and handles also allow you to secure your bottle to your belt or bag with a carabiner.
Aim for something that holds between 20 ounces and 32 ounces.
